The previous article briefly introduced Jest configuration, achieving the ability to run tests through simple configuration. This article focuses on how to test React projects, with a different emphasis.
Project Tech Stack
Because it’s a general UI component library, it doesn’t involve redux, APIs, etc. The overall tech stack is relatively simple
- React
- TypeScript
- Antd
- Less
- react-intl
Testing Objectives
When doing testing, first determine what to test.
- Testing the functional correctness of utility functions
- Testing component functionality [UI, interactivity, etc.]
3A Principle
准备
arrangeThe preparation part of the unit test method initializes objects and sets the values of data passed to the method under test
执行
actThe execution part calls the method under test with the prepared parameters.
断言
assertThe assertion part verifies that the execution behavior of the method under test matches expectations.
测试配置
Creating intl-enzyme-test-helper
Because I don’t want to test internationalization, I’m mocking it here. If not mocked, it will throw intlProvider errors.
import React from 'react';
import { IntlProvider, intlShape } from 'react-intl';
import { mount, render, shallow } from 'enzyme';

const messages = {}; // en.json

const intlProvider = new IntlProvider({ locale: 'en', messages, onError: () => '' }, {});
const { intl } = intlProvider.getChildContext();

function nodeWithIntlProp(node) {
  return React.cloneElement(node, { intl });
}

export function shallowWithIntl(node) {
  return shallow(nodeWithIntlProp(node), { context: { intl } });
}

export function mountWithIntl(node) {
  return mount(nodeWithIntlProp(node), {
    context: { intl },
    childContextTypes: { intl: intlShape }
  });
}

export function renderWithIntl(node) {
  return render(nodeWithIntlProp(node), {
    context: { intl },
    childContextTypes: { intl: intlShape }
  });
}

export function rendererWithIntl(node) {
  return renderer.create(<IntlProvider locale='en' messages={messages}>{node}</IntlProvider>);
}
Complete code, see here
Suppressing intl Internationalization Missing Errors
Because internationalization information isn’t configured const messages = {}; // en.json, the unit tests pass but will report some errors that interfere with console information display, so we simply suppress the errors here.
onError: () => ''
使用方法
Creating enzyme-setup
Component testing uses enzyme, so we also need to enable the corresponding enzyme-adapter-react-16
import { configure } from 'enzyme';
import Adapter from 'enzyme-adapter-react-16';

// React 16 Enzyme adapter
configure({ adapter: new Adapter() });
Jest also needs corresponding configuration
setupFiles: ['<rootDir>/test/enzyme-setup.ts']
If not configured, it will report errors
Error: Enzyme Internal Error: Enzyme expects an adapter to be configured, but found none. To configure an adapter, you should call
Enzyme.configure({ adapter: new Adapter() })before using any of Enzyme’s top level APIs, whereAdapteris the adapter corresponding to the library currently being tested. For example:
Utility Function Testing
Utility function testing is relatively the simplest. Just determine the input and output. Extending this, for frontend projects containing redux technology, if we want to test a reducer, it’s actually the same as below. I understand this type as pure functions [determine input, then determine output].
import { formatPrice } from '../../components/utils/common-utils';

describe('common-utils test', () => {
  it('should return formatted price when value is 0 or undefined or null', () => {
    expect(formatPrice(0)).toEqual('');
    expect(formatPrice(undefined)).toEqual('');
    expect(formatPrice(null)).toEqual('');
  });
});
Component Testing
Component testing inevitably involves the three methods provided by enzyme: mount, render, shallow.
Differences Between render, mount, and shallow
render采用的是第三方库Cheerio的渲染,渲染结果是普通的html结构,对于snapshot使用render比较合适。shallow和mount对组件的渲染结果不是html的dom树,而是react树,如果你chrome装了react devtool插件,他的渲染结果就是react devtool tab下查看的组件结构,而render函数的结果是element tab下查看的结果。
这些只是渲染结果上的差别,更大的差别是shallow和mount的结果是个被封装的ReactWrapper,可以进行多种操作,譬如find()、parents()、children()等选择器进行元素查找;state()、props()进行数据查找,setState()、setprops()操作数据;simulate()模拟事件触发。
shallow只渲染当前组件,只能对当前组件做断言;mount会渲染当前组件以及所有子组件,对所有子组件也可以做上述操作。一般交互测试都会关心到子组件,我使用的都是mount。但是mount耗时更长,内存啥的也都占用的更多,如果没必要操作和断言子组件,可以使用shallow。
Component Rendering and Interaction Testing
LCollapsedDescription is a description component with collapse functionality
import * as React from 'react';
import LCollapsedDescription, { LDescriptionItem } from '../../components/collapsed-description';
import { mountWithIntl } from '../intl-enzyme-test-helper';
describe('collapsed-description component test', () => {
const items: LDescriptionItem[] = [
{
label: 'name',
value: '1111'
},
{
label: 'date',
value: '2019/10/01'
},
{
label: 'price',
value: 1000
}
];
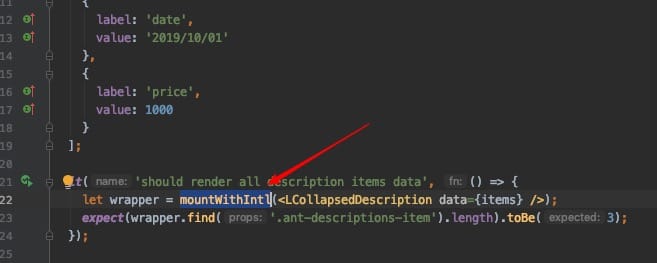
it('should render all description items data', () => {
let wrapper = mountWithIntl(<LCollapsedDescription data={items} />);
expect(wrapper.find('td').length).toBe(3);
});
it('should render two description items data when limit is 2', () => {
let wrapper = mountWithIntl(<LCollapsedDescription data={items} limit={2} />);
expect(wrapper.find('td').length).toBe(2);
wrapper.find('Icon').simulate('click');
expect(wrapper.find('td').length).toBe(3);
wrapper.find('Icon').simulate('click');
expect(wrapper.find('td').length).toBe(2);
});
it('should render description items each row data', () => {
const wrapper1 = mountWithIntl(<LCollapsedDescription data={items} />);
expect(wrapper1.find('tr').at(0).children().length).toBe(3);
const wrapper2 = mountWithIntl(<LCollapsedDescription data={items} column={2} />);
expect(wrapper2.find('tr').at(0).children().length).toBe(2);
expect(wrapper2.find('tr').at(1).children().length).toBe(1);
});
});
For the above case, note a few points:
- If in case1, change
mountWithIntltoshallowWithIntland rerun the UT, it will fail because according to the differences between the three methods mentioned above, shallow only renders the current component, while mount and render render child components. So changing it torenderWithIntlhere will work. - If in case2, change
mountWithIntltorenderWithIntland rerun the UT, it will fail because render renders actual DOM elements, while tags starting with capital letters are React component tags, so they definitely won’t be found. Additionally, the simulate method doesn’t exist
Through the above examples, we have a clear understanding of the differences between the three methods. In actual use, as always, use them as needed.
Snapshot Testing
Snapshot testing saves a snapshot file of the React component’s rendering results under different conditions when run for the first time. Each subsequent time snapshot testing is run, it will be compared with the first time.
import renderer from 'react-test-renderer';
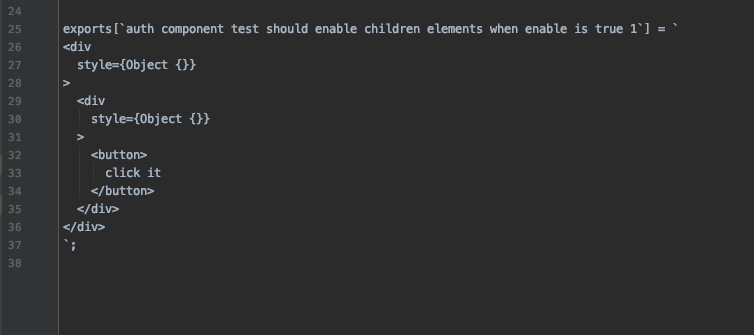
it('should enable children elements when enable is true', () => {
const wrapper = renderer.create(<AuthEnable enable>
<button>click it</button>
</AuthEnable>).toJSON();
expect(wrapper).toMatchSnapshot();
});
- Snapshot testing is used to prevent unintentional structural and style changes caused by component modifications.
- Snapshot testing is only a supplement
If we unintentionally modify a component causing style changes, when the UT fails, it will display specific error information to help us troubleshoot.

Differences Between Enzyme and react-test-renderer Snapshot Testing
Comparison shows that react-test-renderer’s snapshots are simpler and more readable, directly displaying the complete HTML source code.
Supplementary Section
Regarding testing for this UI component library, these are the basic knowledge points. What follows is just continuously enriching testing based on these knowledge points.
But since we’re talking about testing, let me supplement with how to do testing that depends on redux, redux-saga.
Reducer Testing
Redux consists of three parts [action, reducer, store]. Action is an object and doesn’t have much to test itself. Reducer is a pure function, so testing it is equivalent to utility function testing. Store is essentially a large object. Personally, I don’t think store needs testing either. When testing components or effects, we just need to mock the store to our target values.
Effects Testing
In the projects I’ve participated in, I’ve extracted all request processing to the effects layer. The React component layer itself doesn’t directly handle any requests, only responsible for data display.
The React component layer no longer directly deals with API requests - this is the approach adopted in my current project.
For individual effects testing, it’s roughly as follows:
Note: API requests are not our focus - we only care about whether the returned data is correct, so mock it
export default class SagaSpecFactory {
  static getAPIStub(apiMethodFunc: any, response: object): any {
    return ({ fn, args }, next) => {
      if (fn === apiMethodFunc) {
        return response;
      }
      return next();
    };
  }
}
Complete code see here
 it('should init app when init app action', () => {
    return expectSaga(initAppActionEffects, { params: {  } })
      .provide([
        {
          call: SagaSpecFactory.getAPIStub(getUserInfo, { data: user })
        },
        {
          call: SagaSpecFactory.getAPIStub(getMenusByUser, menus)
        }
      ])
      .call(getUserInfo)
      .call(getMenusByUser, user)
      .put.like({
        action: {
          type: GlobalActionTypes.INIT_MENU,
          menus
        }
      })
      .put.like({
        action: initAppCompleteAction()
      })
      .run();
  });
Final Thoughts
Regarding testing, I have two feelings:
- Don’t test just for the sake of testing. If writing tests doesn’t bring any benefits, then please don’t write them. Both development and testing need to consider ROI - don’t do losing deals.
- Testing is meant to reduce the cost of manual testing. Repeated testing is physical labor anyway, while automated testing also improves development efficiency/quality. Good tests can even serve as living documentation. For team projects, to improve overall development efficiency and quality, I personally believe tests should be written, but the amount depends on the actual situation.
- The above are all my superficial views - they may not all be correct, but they’re certainly moving in the right direction.