Frontend Tree Shaking
Single-page applications deliver smoother frontend experiences, but they also introduce headaches such as SEO and ballooning bundle sizes. Fortunately, solutions outnumber problems; tree shaking is one way to optimize bundle size.
Concept
tree shaking—what is it?
Tree shaking is a term commonly used in the JavaScript context for dead-code elimination. It relies on the static structure of ES2015 module syntax, i.e. import and export. The name and concept have been popularized by the ES2015 module bundler rollup.
The webpack 2 release came with built-in support for ES2015 modules (alias harmony modules) as well as unused module export detection. The new webpack 4 release expands on this capability with a way to provide hints to the compiler via the “sideEffects” package.json property to denote which files in your project are “pure” and therefore safe to prune if unused.
Key Points
- tree shaking is a term that was first popularized by rollup.
- tree shaking is one approach to DCE (Dead Code Elimination); for example, linting return statements with ESLint is another way to remove unreachable code.
- tree shaking relies on ES6’s static module structure—
importandexport—so CommonJS cannot support tree shaking. - The goal of tree shaking is to remove unused code (dead code).
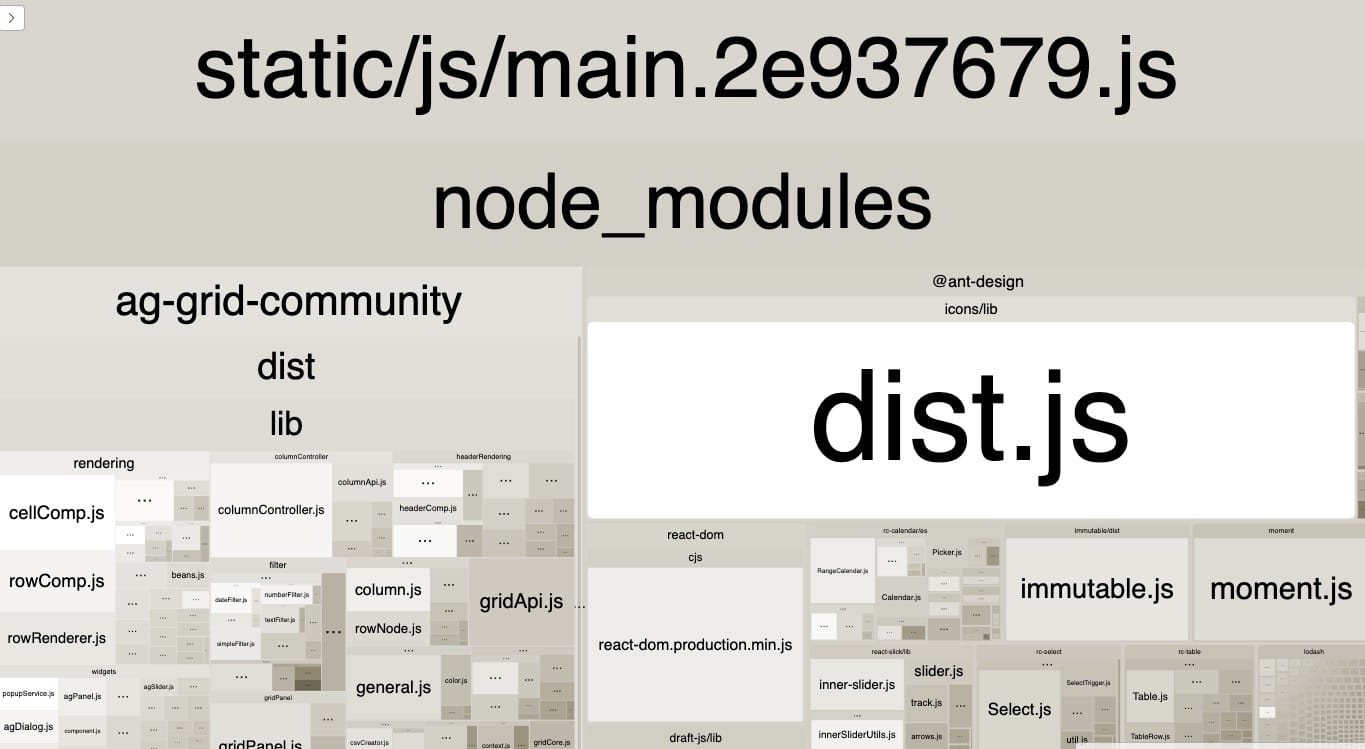
Helper Tool: webpack-bundle-analyzer
To make it easier to inspect which modules affect bundle size, install the webpack-bundle-analyzer plugin. It helps you confirm whether optimizations actually work as you iterate.
Time to install.
Add Script Configuration in package.json
"build:analyzer": "node scripts/build.js analyzer",
analyzeris a custom flag.- Bundle analysis only makes sense against the production build, because the goal of size optimization is the production bundle.
Add the Plugin in the webpack Build Script
webpack.config.prod.js
const plugins = getPlugins();
if (process.argv[2] === 'analyzer') {
    plugins.push(new bundleAnalyzerPlugin());
}
Notes
- Detect whether the build script receives the
analyzerargument to decide if analysis should run. I only want to start the analyzer locally when I need to inspect bundle size. - By default, BundleAnalyzerPlugin starts an HTTP server to display the bundle report. When you run
build:analyzer, a local web service starts, using port 8888 by default.
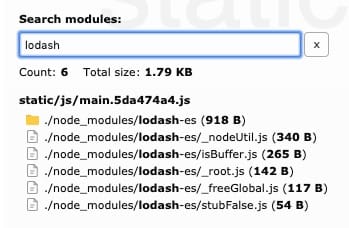
Once the service is running, visit http://127.0.0.1:8888/ and you’ll see a report like the one below.
Example
Note: We’ll use a project initialized with create-react-app to demonstrate tree shaking.
Tech Stack
    "webpack": "4.41.0",
    "lodash": "^4.17.15"
Here are the key packages. We’ll slim down both the third-party library lodash and the project’s own code.
When we perform tree shaking, the targets are either our project code or the third-party dependencies we import. We’ll tackle both.
Let’s walk through an example.
Before Enabling Tree Shaking
Project Code
Create two utility functions:
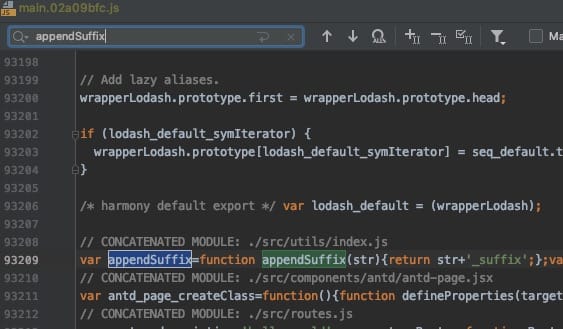
export const appendSuffix = str => str + '_suffix';

export const appendPrefix = str => 'prefix_' + str;
Suppose the entire app only uses appendPrefix. After bundling, if you search the compiled JavaScript, you’ll see that appendSuffix still exists alongside appendPrefix. That’s the dead code we want to eliminate.
Because removing dead code in simple utility functions barely changes the bundle size, I'm not focusing on the overall size impact for this section.
Third-Party lodash
Beyond our own utilities, we often rely on third-party toolkits such as lodash.
Imagine we use the map function. The relevant code looks like this:
import _ from 'lodash';

 render() {
        const columns = _.map(this.columns);
        return (
            <React.Fragment>
                {
                    JSON.stringify(columns)
                }
                <div>
                    {
                        appendPrefix('bob')
                    }
                </div>
            </React.Fragment>
        );
    }
After building, the bundle size looks like this: [… omitted 13 of 269 lines …]
In my webpack config I set mode to production:
module.exports = {
    // Don't attempt to continue if there are any errors.
    bail: true,
    // We generate sourcemaps in production. This is slow but gives good results.
    // You can exclude the *.map files from the build during deployment.
    devtool: shouldUseSourceMap ? 'source-map' : false,
    // In production, we only want to load the polyfills and the app code.
    entry: [require.resolve('./polyfills'), paths.appIndexJs],
    mode: 'production', // Change: enable production mode
    ...
    }
When mode is production, webpack enables TerserPlugin by default, which removes code that isn’t used, such as appendSuffix.
After making the change and rebuilding, searching the bundled files no longer finds _suffix, although you can still find prefix.
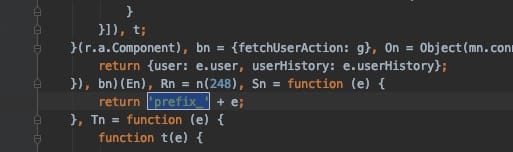
I searched for the suffix string rather than the function name because the plugin performs tree shaking and also minifies the code, so function names get mangled.
That gives us confidence that production mode removes basic dead code.
Dead Code in lodash
The previous setting only removes simple code. The overall bundle size remains almost unchanged—why? Because the full lodash library is still there. So let’s keep trimming.
Setup
Lodash’s primary package exports CommonJS modules, which cannot be tree shaken. There are other approaches, but to stay within the tree shaking theme, we’ll install the ES module build of lodash instead.
Install
lodash-esyarn remove lodash yarn add lodash-esUpdate the import syntax
import {map} from 'lodash-es';
lodash-es exports ES modules, so we can rely on that to import only what we need. Unused modules will be removed during bundling.
Run the app again and you’ll notice a significant reduction in lodash’s size.
We’ve now addressed both the project code and the third-party lodash bundle. Let’s also talk about antd, since it’s a common dependency.
antd Bundle Size
Projects often use the antd UI component library, but we rarely need every component. How do we manage the bundle size? The official documentation suggests the following.
babel-plugin-importyarn add babel-plugin-importConfigure the Babel plugin
 "plugins": [
  [
    "import",
    {
      "libraryName": "antd",
      "libraryDirectory": "es",
      "style": "css"
    }
  ]
]
Rewrite the imports
import {Button, Table} from 'antd';
Notes
Thanks to the Babel plugin configuration, components and their styles are both loaded on demand. You no longer need to import the full antd stylesheet globally or add component styles manually.
Without the plugin, you can still achieve tree shaking with the following imports:
import Button from 'antd/es/button';
import Table from 'antd/es/table';
import 'antd/es/button/style/css';
import 'antd/es/table/style/css';
Compared with the manual approach above, which do you prefer? It’s subjective, but I like the plugin setup, which antd officially recommends. One reason is that it supports importing multiple components at once.
Side Effects
“Side effects” is a term you might recognize if you’ve used redux-saga.
If a module has side effects, tree shaking cannot remove that code. After tree shaking, only code with side effects is retained; any unused, side-effect-free code is removed.
Check lodash’s package files and you’ll see that lodash is free of side effects. That’s why we can tree shake it in the earlier example.
Can’t You Tree Shake Code with Side Effects?
Correct—you can’t.
Final Thoughts
These takeaways came from challenges in real projects. Digging deeper produced this write-up, which I hope serves as a starting point for others.
References
- webpack official doc
- 你的Tree-Shaking并没什么卵用
- The Correct Way to Import Lodash Libraries
- Reduce JavaScript Payloads with Tree Shaking
- 配置Tree Shaking来减少JavaScript的打包体积
- es6-modules-in-depth
- Tree-shaking in real world: what could go wrong?
- 使用 Tree Shaking
- Webpack Deep Scope Analysis Plugin
- GitHub Issue – Tree Shaking?
- tree-shaking不完全指南
- tree-shaking
- Dead Code Elimination